In the last devlog, I talked about the practical design problems I sought to solve in my campaign by creating an adventurer city, and of course one of the reasons Pathika is going to be shared publicly is because I think the idea will bring a lot of similar conveniences to your game.
To briefly recap, having some kind of town or settlement which prominently features adventuring guilds gives you a ready source of rival adventurers (which, as I argue in that post, really helps with running most aspects of a game) and introduces some fun boomtown-esque instability to your adventuring hub.
But the thing about Pathika is that much of it is my own conception of what such a city would look like. The first portion of it is written broadly (with lots of generators) to help you bring your own version of it to life, but my own biases toward silliness and chaos pervade that text even before you get to the second half — the pre-written material you can directly drop into your game. So what I’m going to do in this devlog, and probably many that will follow, is help you figure out how to build your campaign’s own adventurer hub town by explaining how I did it for my own game.
The Bare Minimum
Long before I started expanding Pathika out to being a full setting book, I had to prep the broad strokes of it for my own game. Here are the things I settled on as most important to prep for my first few sessions, in no particular order:
- Culture: the dominant traditions, aesthetics, languages, tech level, etc. of the city.
- Scenery: literally what players are going to see on the street as they walk around doing other things. These are not encounters.
- Laws and norms: This is similar to culture, but more specifically what will and won’t get your players in trouble, and also what trouble looks like.
- Three guilds, one in detail: In another kind of city these would be factions to watch out for. Here I put that weight on the guilds instead. One is for the players and the other two are potential rivals or allies.
- NPCs: A boss, a rumormonger, a shady criminal friend, an experienced rival, a bureaucrat, and an intern. Explanations for why I chose these six NPCs to prep first are below.
- A job board: Usually in an OSR game you’d just give the players plot hooks via rumors, but for professional adventurers I think it makes sense to offer some adventures as actual job offers, and let the players seek rumors about them.
- Encounters: For when you spend an entire session in town and the players go looking for trouble.
- Lists of names: Shop names, NPC names, and guild names were the big three I wrote before starting. I wrote a lot more than I actually needed; probably like ten of each should suffice.
There were of course other questions going through my head as I was prepping all of this, like “how does the government work?” or “where does the food come from?” or “what are the major neighborhoods and what are they known for?” and all of that was answered to some degree over time. But the important thing when you’re starting out is answering these questions on a smaller scale. Figuring out how players might get into trouble with the law is answering just enough about government for now, and likewise figuring out what the guilds are in dire need of will answer just enough of how the town feeds and funds itself.
Here’s how I went about prepping answers to each of these questions and my recommendations for getting these done for your own game:
Culture
An adventuring town will invariably host people from all reaches of your campaign map, so its culture is going to end up being a mish mash and kind of a preview of what sorts of people, traditions, religions, fashion, weaponry, etc. exists across that map. In my case, I knew that the continent my game took place on would have a lot of Indian, Chinese and Caribbean flavor to it, so it made sense for me to make those the dominant cultural forces in Pathika. Further away on the map, though, were places like the Ultraviolet Grasslands, the Hill Cantons, Dolmenwood, etc. So I took things like the bears from Hill Cantons, vomes from UVG, etc. and peppered a bit of those into the city as well. I also wrote out some short lists of names to pull from for each of these cultures, which was helpful since not every culture I had represented in the city was one I could riff a name for (for example, people from UVG).
I recommend following similar logic for your game: give a lot of representation to the places your players will see most, and then give little hints about or place a few NPCs from the further reaches of the campaign world.
You’ll also want to set the relative tech level for your town. In Pathika’s case I chose to emphasize its instability by having different kinds of technology be a little ahead or a little behind other places. Maybe people are living in more primitive homes but they have bicycles. Or maybe there’s no sewer system, cisterns, etc. but the government uses magic items to produce potable water and dispose of waste. Maybe no one knows how to forge steel weaponry but some rifled firearms were brought back from various adventures.
Scenery
I don’t know if this is just personal problem or what, but one of my big beefs with setting books, including city books, is how I have to search to find street-level descriptions of what the players see, hear, smell, etc. One of the better examples I’ve seen of this recently is in the Lankhmar city book that comes in the DCC boxed set, which has lists of “street scenes” you can roll on:
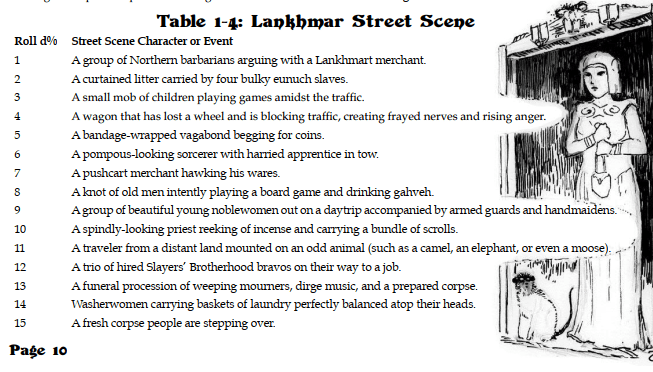
By sheer coincidence, I had gone in a similar direction for Pathika where I had a set of “scenes” separated into neighborhood geography, sights, sounds, smells and chatter. I only had a few of these written out for my home game, relying on my own intuition to improvise more as needed. For the book, I expanded this into 20 scenes, I believe 10 of which you’ll get to see in the preview.
As far as prepping for your home game, I think the Lankhmar format makes more sense. You’ll naturally be able to call on the most obvious sensory details for scenes you’ve written yourself, so just write down the ones that are surprising or add a little twist to everything else.
As for what should go in the street scenes, for me I chose to focus on things that would be unique to an adventuring town. My scenes focused on things like unusual geography, anachronisms found only in Pathika, what are Pathika’s children usually up to, what kinds of goods are weirdly cheap or expensive, etc. In other words, I often chose to use these scenes to deliver elements of setting to the players without intruding too much on their current adventure.
Laws and Norms
One of the first things I decided when creating Pathika was that the city government was not the primary source of conflict resolution in the city. With guilds full of adventurers running around, possibly returning from expeditions with magical WMDs, I reasoned that guilds would be in constant negotiation with each other to avoid escalating violence. I also thought it would be interesting for the city to have a comically ill-designed, understaffed and blatantly corrupt justice system, so it made sense to me that guilds would only use this to solve smaller conflicts and to keep up appearances of order and stability.
Note that these both came from three very low to the ground concerns: 1) I wanted the players to have conflicts with other adventurers in the field that spill over into their time in the city without having clean legal resolutions to these conflicts. The looming threat of a guild war or perhaps bad but not overly outright hostile relations with another guild seemed like it would create fun social dynamics. 2) One of the themes I wanted to mechanize and explore in this campaign was the idea of fame and reputation as an adventurer, so having one’s reputation be a key element to conflict resolution just made sense. 3) On an even more immediate level, I wanted an excuse for the party to take part in a ridiculous and confusing trial in court for part of their first full session in town.
And really that’s the advice I would give for building out the norms: start from the kinds of play you’re interested in, scenarios you’d like to put in front of your players for this or that session, and then create the kind of political environment that facilitates this. I’m probably going to sound like a broken record saying this, but when building a TTRPG setting I think it’s a good idea to start with things you want to do or present in a session and then ask how those situations would come about. First answer this on a more immediate, session-relevant level, and then extrapolate this out to less visible elements of the setting when you have time.
Three Guilds, One in Detail
This one’s a lot simpler. First, flesh out the guild your players will interact with the most, which is likely to be their own guild. For my first session in Pathika, this was basically imagining what it would look like for the players to bring their loot back to the guild hall for inspection and fencing and what cut the guild would take. Would their boss be happy with that haul? Would they have any uncomfortable news to share or crimes to admit that the guild might need to know about? That kind of thing.
Then, sketch the broadest details out of two more guilds. I usually give each one a distinctive dress code or fashion statement and some kind of martial arts or magic related gimmick. I also give each one a thing they have a surplus of and a thing they have a shortage of.
Make one of these guilds a rival and make one of them an uncertain ally. The rival one is obvious, because this guild is going to provide all the rival adventurers who threaten to steal the party’s loot, take over portions of a dungeon, etc. out in the field. The uncertain ally is helpful for giving low level players some extra bodies to take into a dungeon with them or to exchange some resources or information with.
You might have noticed, by the way, that I gave the other guilds a distinctive dress code and gimmick, but I didn’t do this for the players’ own guild. This was intentional and purely pragmatic: I didn’t want to force my players into a specific aesthetic or gameplay gimmick, so I usually just said their guild was newer, less organized and had less of an identity than others. This way the players could decide over time what they wanted their guild’s salient features to be.
NPCs
This is one you probably need the least advice on, as chances are you already have party or plot hook-related NPCs you’ll be working on for your campaign. However, I genuinely think the following kinds of NPCs are useful to have in an adventuring hub, which is why they were the first ones I sketched out:
Boss: The guild chief. The person who tells the party what they’re doing wrong and what kinds of obligations they have. This is the party’s source of information for guild politics, and they’ll represent both the upsides and downsides of being part of an adventuring organization.
Rumormonger: I like to have at least one source of rumors that players can specifically visit, bargain with, and question. In my game, this was also the shady criminal friend (below), but there can be good reasons to separate them. For example, having your rumor monger be a town gossip and socialite gives you an easy way to update the players on their reputations, current events in the city, etc.
Shady criminal friend: Normally this could just be the same as the rumormonger, but in my case I was introducing a D&D 5e group to OSR style sandbox play where they’d set their own goals, come up with their own money-making ideas, etc. Having a shady criminal friend around gives them an NPC to bounce ideas off of, get advice from, etc. They’re kind of like a hint giver and a personal shopper, but for illegal shit. Depending on your player group, this may not be necessary.
Experienced rival: This is just a particularly memorable rival the players could run into in the field or in town who is competent enough to scheme against them, lead their own adventuring party, etc. For my group of players, the rival would sometimes be seen disarming traps or using unusual tactics to get a leg up on the players, so they had a bit of a hint giving purpose as well.
Bureaucrat: This is a pretty versatile NPC. The players can bribe them for information or just learn about how your city works from them generally. They also work as a potential ally or antagonist if the players decide to get involved in intrigue-oriented adventures in town.
Intern: This is at the bottom of the list for a reason, and maybe it’s just my own tastes showing here, but I think giving your players a mentee of sorts is a good idea in general. It’s a hireling they can be invested in, and also it’s someone who is always going to be asking them to explain or demonstrate what it means to be in the profession. It’s an NPC who can help the players a little, give them someone they (hopefully) want to protect, and provide for some introspective roleplaying. Seriously, give it a try. I bet you’ll like the results.
Job Board
It’s pretty common to just give players rumors about adventure hooks and profitable locations, but for a town where adventuring is a profession, I think it makes sense to have some kind of organized way to post requests. This also lets you separate your plot hooks into at least two bins: 1) pre-packaged jobs with set terms and pay and 2) hot tips your players can leverage to come up with their own adventures and goals. I think having at least one of each of these at any given time is helpful, as the players aren’t always going to be in the mood for elaborate scheming. Sometimes they’ll just want a known employer to bargain with, a known goal, and a minimum reward for attaining it.
The kinds of jobs that would show up on this board is beyond the scope of this document as that gets more into adventure design in general, but I would encourage you to put some minor things on the board that would not necessarily rise to the level of adventures or quests. Maybe a shopkeeper needs a certain kind of material, or there’s a quick task that could introduce the players to an interesting NPC. The job board can thus serve double duty as a source of smaller goals or a pointer to fun game objects the players can consider interacting with as they go about their bigger business.
Encounters
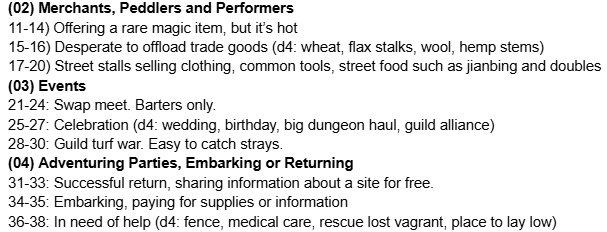
City encounters are something every city book seems to do very differently. For Pathika I wrote out 100 individually described encounters because that’s the kind of pre-written material I love to pull from a book, but when you’re planning for a session you obviously don’t have time to do that. Instead, I’d recommend following the format of something like Hill Cantons, where you write down the kinds of people players are likely to interact with and a few situations for each that would demand the players’ attention or active evasion. For the upcoming preview book, I converted the encounter list back into something more compact and closer to what I’d use to prep for a campaign, a snippet of which you can look at below:
If you’re really short on time, just make a d10 table of NPC types (criminals, kids, performers, merchants, etc.) and rely on OSR-style reaction rolls to tell you the rest. There are many better blogs that can tell you how to write the perfect city encounter, but I follow three general principles when writing them: 1) the players should have to make a decision of some kind which could involve spending time, even if they ultimately avoid interacting with the encounter, 2) city encounters should more often hook into other elements of play than be closed systems of decision-making (but a little bit of the latter is good to have), and 3) each encounter should ideally touch on some interesting and unique element of the city.
Lists
This is probably the least important thing to prep for many of the folks reading this blog post, as you’ll probably be able to improvise names of people, guilds, etc. in your setting. However, this was something I enjoyed doing when my attention wandered away from prepping the rest of the elements above, and inevitably writing the name of a shop or a guild down would spark some inspiration for a thing I wanted to include in the campaign. In a way, writing tables of names for various elements of Pathika ended up being like my own kind of “spark table”, so to speak.
If you’re the type to prefer having a list but aren’t sure what to prep, I recommend shop names, guild names and character names of cultures you can’t readily riff on.
Way Past the Minimum
While Pathika as a book is going to include a lot more than this, this prep work is how it started and is probably enough to keep you going for a few sessions. Remember, you’re always going to be starting from things you want to explore in a session and asking questions later about why that stuff is there. These implications are what turned Pathika into the more fleshed out city you’ll see in the book, and they’re what will make your own version of it uniquely suited to and reflective of your game world. 
P.S. As always, please subscribe to the newsletter to keep up with the development of Pathika, get exclusive previews of its content, and to show support for the book!

0 comments on “Pathika Devlog #2: Creating Your Own Adventurer City”